This chapter contains the following topics:
Register Devices and Form Setup
In Passport Point of Sale, a register is the computer or terminal where transactions are entered. A register is defined within a store and may, or may not, have a cash drawer or display device attached.
Each register can be configured to allow different types of transactions to be processed under a variety of conditions. For example, there may be a couple of cash registers that work strictly as retail Point of Sale, where the default transaction type is an invoice and inventory out-of-stock conditions are ignored. Another register, at a sales person’s desk might be functioning as an order processing station where customer orders are entered for later invoicing and shipping. A third register at a service desk, might be set up to handle customer returns.
Use this selection to define the registers within a store. Define each register to suit specific processing needs.
Select
Registers from the Setup information menu.
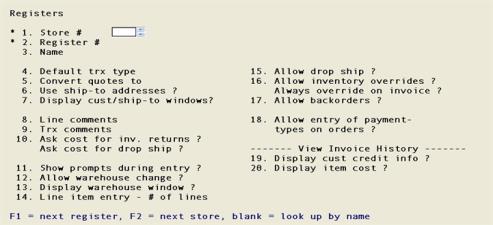
The following screen displays:
From this screen you can add new registers to a store or modify information about existing registers. Each register you enter here is associated with an existing store.
*1. Store #
Options
Enter an existing store number or use one of the options. Go to the Stores chapter more information on setting up a store.
|
<F1> |
To scan existing registers. |
|
<F2> |
To scan existing stores in order by store number. |
|
<Enter> |
Search for a store by store name. |
|
Format |
Up to two or three characters depending on the invoice format you defined in Control information. The store must be defined in Stores. |
|
Example |
A |
Store name
Options
If you press <Enter> in field 1, the cursor will move to the store name field. Here you can enter the name of a store or use one of these options.
|
<F2> |
Scan through existing stores by store name. |
|
<Enter> |
Search for a store using the store number. |
|
Format |
Up to 25 characters. |
|
Example |
Type XYZ Company |
*2. Register #
Options
Enter a register number for the register or use one the option.
|
<F1> |
Scan through existing registers beginning in the entered store. |
|
Format |
Up to three characters. |
|
Example |
Type 1 |
3. Name
Enter the name that will be associated with this register.
|
Format |
Up to 25 characters. |
|
Example |
Type Front Counter |
Options
If there are other registers, you will be given the opportunity to copy an existing register’s information to the register you are adding. You can copy register information from any previously entered register.
After you enter a name for the register, you will be asked whether, or not, you want to copy information from an existing register.
Copy from an existing register ?
|
Format |
One character, either Y or N. |
|
Example |
Type N |
If you answer Y to this question you will be prompted to enter a store and register number to copy from.
Copy from store number: register number:
Enter a store number.
|
Format |
Up to two or three characters depending on the invoice format you defined in Control information. |
Enter a register number.
|
Format |
Up to three characters. |
Enter the type of transaction that will be processed most often at this register. The transaction type you choose here will be the default that is used when processing transactions at this register.
Options
You may enter one of the following.
|
I |
Default to Invoice transaction type at this register. |
|
O |
Default to Order transaction type at this register. |
|
C |
Default to Credit memo transaction type at this register. |
|
R |
Default to Returns transaction type at this register. |
|
Q |
Default to Quote transaction type at this register. |
|
L |
Default to Layaway transaction type at this register. |
|
P |
Default to Payment transaction type at this register. |
|
Format |
One character, either I, O, C, R, Q, L or P |
|
Example |
Type I to default to Invoice transaction type when entering transactions using this register |
An entered quote can be converted to an Invoice or an Order transaction type from the transaction processing screen. Read more about Entering Quotes.
Options
The value in this field will determine how quotes are converted.
|
I |
Convert quotes to Invoice (I) type transactions. |
|
O |
Convert quotes to Order (0) type transactions. |
Your response here will generally conform to the default transaction type for registers that default to Invoices or Orders.
The value you enter here determines whether or not you will be allowed to specify ship-to addresses that are different than a customer’s billing address at this register.
Options
You may allow or disallow use of ship-to addresses from this register.
|
Y |
Allow entry of ship-to addresses that are different than the customer’s billing address. |
|
N |
The ship-to address will be the same as the billing address. |
|
Format |
One character, either Y or N. |
|
Example |
Type Y |
If you enter N in this field, the ship-to field on a transaction record will be skipped. You will not be allowed to enter a ship-to address for the transaction.
For information on entry of ship-tos refer to the Ship-to Addresses chapter.
7. Display cust/ship-to windows ?
During transaction processing, you have the option of displaying additional information about customers and ship-to addresses when the cursor is positioned in those respective fields.
If you answer Y to this selection the following additional prompts and information will be displayed.
|
Field |
What You’ll get |
|
Cust # |
A window will be opened that displays the customer address and offers prompts to scroll through the customers that you have on file, to process customer by name instead of number and to use the same customer for this transaction that was used for the previous transaction. |
|
Ship to |
A window will be opened that displays the full ship-to address and offers prompts to scroll through the ship-to addresses for the selected customer, to use the customer’s billing address or to enter a new ship-to address. |
|
Format |
One character, either Y or N |
|
Example |
Type Y to display customer and ship-to windows during transaction entry. |
Displaying these windows can slow down the data entry process. If you decide that you don't want to display these windows later, you can return to this register and change this entry to N.
Comments can be entered for individual line items on a transaction. These comments can be printed on various forms and reports; invoices, picking tickets, and the Transaction Edit List.
Options
You may define how these comments are handled during transaction entry.
|
A |
Automatic - Always open comment entry window for line comments when a line is entered. |
|
M |
Manual - Allow entry of comments as desired, but do not automatically open comment entry window. |
|
N |
None - Do not allow entry of line comments. |
|
Format |
One character, either A, M or N |
|
Example |
Type M to allow entry of line comments but to suppress automatic display of the comment entry window. |
You can also enter comments that pertain to the transaction as a whole. These comments can also be printed on various forms and reports.
Options
You may define how these comments are handled during transaction entry.
|
A |
Automatic - Always open comment entry window for transaction comments. |
|
M |
Manual - Allow entry of transaction comments as desired, but do not automatically open comment entry window. |
|
N |
None - Do not allow entry of transaction comments. |
|
Format |
One character, either A, M or N |
|
Example |
Type M to allow entry of transaction comments to suppress automatic display of comment entry window. |
10. Ask cost for inv. returns ?
This selection allows you to define whether users of this register will be prompted to enter a cost when an item is returned.
This selection allows you to define whether users of this register will be prompted for the cost of an item that is being drop shipped.
11. Show prompts during entry ?
Prompts refer to messages displayed in the message area of the transaction screen while you are entering transactions. These prompts are displayed to indicate the options or function keys that are available for transaction input fields.
Your entry in this field will determine whether these prompts are displayed on the screen when you are entering transaction.
|
Format |
One character, either Y or N |
|
Example |
Type Y to display prompts when you enter or edit a transaction. |
|
Note |
You can toggle the display of prompts, from the Miscellaneous Functions Window, at any time during transaction processing by pressing <F5> when the cursor is positioned in any field on the transaction screen. |
Your answer here determines whether users of this register will be able to sell items from multiple warehouses or will be restricted to selling items that are stocked in the store’s default warehouse.
|
Format |
One character, either Y or N |
|
Example |
Type Y to sell from multiple warehouses |
13. Display warehouse window ?
This selection controls the display of item quantity on-hand, quantity committed and quantity available for an item during transaction entry.
|
Format |
One character, either Y or N |
|
Example |
Type Y to display the warehouse window |
14. Line item entry - # of lines
When you are entering transactions in Point of Sale, the line item area of the screen can be configured to show one or two lines per line item.
Electing to show one line per line item, allows for display of five line items at a time on the screen. If you wish to display two lines for each line item, up to three line items will be visible at a time.
|
Format |
One number, either 1 to display line items in single-line format or 2 to display two lines for each line item. |
|
Example |
Type 1 to display a single line for each line item. |
Your answer here determines whether the user of this register will be able to drop-ship items directly from vendors to customers.
|
Format |
One character, either Y or N |
|
Example |
Type Y to allow drop-shipments from this register. |
16. Allow inventory overrides ?
Answer Y to let the user of this register sell an item even if inventory information shows it as being out of stock. An override is typically used when the customer is physically holding the item being purchased. When an override is used, the quantity sold is subtracted from the quantity available for the item. This results in a negative quantity available.
|
Format |
One character, either Y or N |
|
Example |
Type Y to allow inventory overrides at this register. |
Always override inventory ?
If this register will operate as a retail point of sale register, you may wish to automatically override inventory that is shown as out of stock. In retail, customers are usually holding the items they are purchasing. In this situation, the out of stock information reported by the computer is automatically considered incorrect. Answer Y to always override out of stock inventory conditions.
|
Format |
One character, either Y or N |
|
Example |
Type Y to always override out of stock inventory conditions. |
This field allows you to allow or disallow back orders from a register. If you answer Y here, users of this register will be able to back order items that are out of stock.
|
Format |
One character, either Y or N |
|
Example |
Type Y to allow back orders from this register. |
18. Allow entry of payment-types on orders ?
If you enter and order (transaction type “O”) and you would like to be able to enter an intended method of payment at the time is entered, enter a Y in this field. This will cause the payment window to display after an “O” type transaction is entered. The payment type entered is documentary as no payment is actually received.
|
Format |
One character, either Y or N |
|
Example |
Type Y to open the payment window after the order is entered. |
19. Display cust credit info ?
Your answer here determines whether customer credit information will be displayed when viewing the customers in Invoice History.
|
Format |
One character, either Y or N |
|
Example |
Type Y show customer credit information. |
This field determines whether an item cost will be displayed when viewing the item detail window in Invoice History.
|
Format |
One character, either Y or N |
|
Example |
Type Y show the item cost. |
Field number to change ?
Options
Make any desired changes or use an option:
|
<Enter> |
to save the information as entered and continue to the next screen. |
|
<ESC> |
to discard new or changed information and exit Registers. |
Press Enter. The following screen displays:
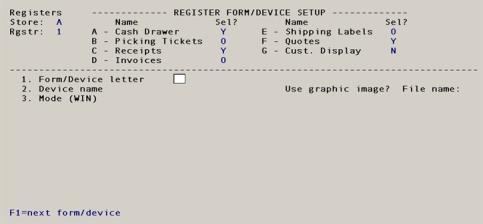
The second screen of Registers allows you to define use parameters for forms and devices for a register.
You can define how and where forms, such as picking tickets, receipts, invoices, quotes, and shipping labels are printed.
On this screen you also define device connections and activation codes for drawers and customer display devices.
Use the second screen of the Registers selection to define the types of forms and devices that will be associated with the register. Information that you enter here depends on the particular type of form or device you will be using.
If you are defining a new register, all of the forms or and devices will display N under the Sel? heading. When you define a form or device, the N will be changed to Y to indicate that this type of form or device is associated with this register.
You have the option of associating seven form or device types with each register. Fields 1 through 3 are common to all forms and devices. Subsequent fields vary depending on the device and will be addressed for each specific device.Available forms and devices are:
|
Letter |
Form or Device |
|
A |
Cash Drawer |
|
B |
Picking Tickets |
|
C |
Receipt Printer |
|
D |
Invoice Printer |
|
E |
Shipping Labels |
|
F |
Quotes |
|
G |
Customer Display Device |
Common Form/Device Fields
1. Form/Device letter
To add or change a form or device, type the corresponding letter shown at the top of the screen or use the option:
|
<F1> |
To scan existing forms and devices already associated with this register. |
|
<F3> |
To void an existing form or device. |
|
Format |
One character from A to G |
|
Example |
Type D to set up an invoice printer for this register |
2. Device name
Enter the device name of the port that your invoice printer is attached to.
For device names for Windows environments you can use the PSI Printer locator or you can use LPT1:, LPT2:, etc. For UNIX/LINUX environments, a typical device name might be /dev/lp0 or /dev/tty01.
Options
Options available to you when entering a printer in Windows:
|
<F2> |
To use Windows printer |
|
<SF2> |
To use the default windows printer |
|
<F7> |
To access the PSI Printer Locator for automatically entering a -Q type printer. For more on the PSI printer location read the PBS Administration documentation. |
|
<SF7> |
To erase the contents of the field and assign a printer with the printer locator |
|
<F1> |
To automatically enter -D LPT1 for a local printer. |
|
Format |
Up to two lines of 64 characters per line |
|
Example |
Enter <SF2> |
Select Y to make a change to the device name field or use the default of N to continue.
|
Format |
One character, either Y or N |
|
Example |
Select <Enter> to use the default of N |
or
3. Mode (WIN)
This field does not pertain to the setup of a cash drawer or customer display device.
This question is different if using UNIX/Linux vs. Windows.
UNIX/Linux
If UNIX or Linux this field determines how your LINUX or UNIX printer is connected to your system. You are given three choices:
|
Letter |
Connection |
|
L |
Local printer connected directly to a terminal |
|
D |
Direct printer connected to your CPU |
|
S |
Spooled printer defined by your operating system (Not available for devices) |
If the printer is set up as a local printer, you will need to specify the control codes to activate and deactivate the auxiliary port on your terminal. Refer to the terminal’s technical manual to determine the correct hexadecimal codes.
|
Note |
IMPORTANT: If more than one register will be printing to the same printer device, the device should be a spooled device. If the printer is not a spooled device and the two registers print to it at the same time, the output from each will collide and become intermixed. |
|
Note |
Spooled Devices: If you decide to set up a device as a spooled device, you may need to modify the spool interface file for the printer, so it will work properly with forms such as invoices. For example, spooled interfaces may be set up to printer banner pages or form feeds after a print job. This behavior is not suitable of forms. |
The option that is used is detected when you enter the Device name field. Here is an explanation of the field options:
|
Option |
Connection |
|
Windows |
You are using a Windows printer drivers. If you are using a Windows printer you must enter the Use graphic image? field and possibly the File name: field. |
|
PCL codes |
Use print PCL codes. When using PCL codes then you will be prompted for the Create PDF? field |
When you select Windows printer driver you have up to two additional fields to enter. They are the following:
Use graphic image?
Answer Y to use a graphic image form file to merge with the data or N to print without an image file.
|
Format |
One letter, either Y or N |
|
Example |
Type N |
If you answer Y, then you will be prompted to enter the name of the file.
File name:
Enter the name of the file that will merge with the forms data. This file must be of a JPEG or Bitmap file format only. The file must be present in the top-level PBS directory called IMAGES and must be spelled exactly as the file name including the proper extension.
|
Format |
12 characters including the extension that must be either .jpg or .bmp. |
|
Example |
Is not entered in this example |
Create PDF?
This option is only available when using PCL Codes.
Enter N to not generate a PDF file. Enter O to generate a PDF only. Enter P to generate a PDF file and print the invoice, picking ticket or quote at the same time. Receipts and labels cannot be generated as PDF files.
|
Format |
One letter, either N, O or P |
|
Example |
Type N |
Depending on the setup here, you may generate PDF (Acrobat type) invoices files. These PDF files can be emailed to customers.
If you selected PDF onlyabove, then the invoice picking ticket or quote will be saved as a PDF file. If you selected PDF file and print, then the PDF file is generate and printed at the same time. The Adobe™ Reader™ or Adobe Acrobat™ can display it as long as one of these applications are installed on your system.
In Windows and Thin client you can view and email these documents under the CTL menu selection Email/view printed PDF's found under PDF form file processing. The overview of configuration for emailing PDF files in PBS is found Email Configuration Appendix from the PBS Administration documentation. Emailing PDF files cannot be done using UNIX or Linux unless you have Thin client.
PDF files are saved on the system in the PDFFIL\PSIPOS directory. An example of the PDF invoice file name is xx_PSI_1_A_001100.PDF. The xx is the company number. The PSI indicates it is a Point of Sale Invoice. A PSQ would be a quote and PSP a picking ticket. The "1" is the customer number and the A_001100 is the invoice number for store A. It it is a picking ticket or quote, then the order number, not invoice number, is part of the file name.
You may also print a test alignment as a PDF. The alignment file is named xx_PSI_TESTPRINT_XX999999.PDF and is located in the PDFFIL\PSIPOS folder. The alignment will display on screen if the proper application is installed.
|
Note |
Example of a Specialized use of the Windows Printer Driver: Here is how to setup a different number of copies per form type. If you are printing to a Windows printer you can setup a printer driver called "Quotes" in the properties and set the number of copies you want, do the same for "Invoices." When you print, you select the appropriate printer driver. You may do the same for selecting a specific tray. One driver setup could be called "Invoices" and the other called "Picking tickets". Any of the printer driver options can be set up this way. |
4. Laser printer ?
This field will display as N/A if you entered W in field 3.
If the form printer you are associating with this register is a laser printer, type Y here.
|
Format |
One character, either Y or N |
|
Example |
Will be N/A in this example |
This field will display as not applicable “N/A“ if using Windows printer or the Windows default printer in the device name field.
5. Printer type
This field will display as N/A if you entered W in field 3.
This field is used only if the printer you are associating with this form is a laser printer and you have answered Y in field 4.
This field will display as not applicable “N/A“ if using Windows printer or the Windows default printer in the device name field.
If you are using a laser printer, the Passport Business Solutions software must know the special job and print control codes to send to the printer to ensure proper operation of the printer.
A list containing popular laser printers will be displayed. Enter the number for the printer that matches or is most compatible with the printer you are using.
|
Format |
Up to two digits |
|
Example |
Will be N/A in this example |
If you cannot find your printer type on the list, refer to your printer’s user manual to find out if your printer is compatible with one of the printers listed. You may want to experiment with different printer types from the pre-defined list.
If the pre-defined printers do not provide satisfactory results, you may select “Other” from this printer selection list and you will be allowed to enter printer controls codes unique to your printer.
|
Note |
If you are test printing for more than one register you should exit and restart PBS to print the setup for a second, third or more registers. This is because PBS retains the printer setup in memory. |
When you select a printer that is not on the list, you must supply the control codes which are used for laser forms printers. These codes can be found in the user manual supplied with your printer or by contacting the printer manufacturer.
If you consider that you have enough technical computer knowledge, you may want to find and provide these codes yourself. Otherwise, contact you supplier for assistance.
If you select “Other” from the list of printers, a window will open prompting you to enter the “Compress” and a “Normal” code for your printer.
Compress
This is the control code sequence that compresses your printed output to 15 or 17 characters per inch so that standard Passport reports and some special form output will fit on 80-column paper. You are allowed to supply up to 60 hexadecimal characters to define the code sequence for your printer.
Use the Hexidecimal Value Entry Window to enter the code provided by your printer user documentation.
|
Format |
Up to 60 hexidecimal characters. |
|
Note |
On UNIX and LINUX systems, is a printer is defined as a “Local” printer in the Mode field, only 48 hexadecimal characters may be entered in this field. |
Normal
“Normal” codes are required to print characters at full width. Full width characters are printed for most special forms such as invoices.
Use the Hexidecimal Value Entry Window to enter the code provided by your printer user documentation.
|
Format |
Up to 60 hexidecimal characters. |
|
Note |
On UNIX and LINUX systems, is a printer is defined as a “Local” printer in the Mode field, only 48 hexidecimal characters may be entered in this field. |
After you answer N to any change, you will be asked “Is this a laser printer?” If you answer Y a window will open to allow you to enter laser control codes.
Printer Reset
The purpose of the printer reset code is to reset the printer’s internal settings (top margin, left margin, page size, tab stops, etc.) to their factory default values. These codes are sent at the very beginning of a new print job so that the setting of the previous print job do not interfere with the new print job. They are also sent at the end of a print job so that the settings of that job do not remain in effect for the following print jobs.
Enter the “Printer reset” codes in hexadecimal format.
Use the Hexidecimal Value Entry Window to enter the code provided by your printer user documentation.
|
Format |
Up to 60 hexidecimal characters. |
Job Control
These codes are sent to the printer at the beginning of a print job, just after the “printer reset” codes. Their purpose is to properly configure the printer for the print job. Use these codes to set up page size, page length, top margin, etc.
Enter the “Job control” codes in hexadecimal format.
Use the Hexidecimal Value Entry Window to enter the code provided by your printer user documentation.
|
Format |
Up to 60 hexidecimal characters. |
Font Control
These codes are sent to the printer after the “job control” codes to select proper type style and size, etc.
Enter the “Font control” codes in hexadecimal format.
Use the Hexidecimal Value Entry Window to enter the code provided by your printer user documentation.
|
Format |
Up to 60 hexidecimal characters. |
Select A to define a cash drawer for this register.
Fields one through three were explained above. The following fields will be presented for entry if you are defining a cash drawer for your register.
This is the control code that is sent to the cash drawer to open it. Opening the drawer is often referred to as “popping” or “dunging” the drawer. The codes that open the cash drawer can be found in the manufacturer’s literature that came with the drawer.
Many drawers will open with the hexadecimal code 01 or 07. Some require that more than one iteration of the code be sent, such as 010101 or 070707.
Enter the “Drawer open code” in hexadecimal format.
Use the Hexidecimal Value Entry Window to enter the code provided by your printer user documentation.
|
Format |
Up to 48 hexadecimal characters. |
|
Example |
070707 |
Field number to change ?
Enter the number of the field you wish to change or use one of the options.
|
<Enter> |
To save the information you have just entered or changed for this form or device. |
|
<Esc> |
To discard entered or changed information for this form or device. |
|
<F2> |
Change a form from instant to optional or vice versa. This option in not available for devices. Instant forms will print immediately after a transaction is completed. Optional forms will only be printed if requested. |
|
<F5> |
To test this form or device. |
The following options are only available for existing forms or devices.
|
<F1> |
To scan through existing forms and devices. |
|
<F3> |
To delete an existing form or device. |
|
<F5> |
To test a receipt, , quote or customer display. |
Select B to define a picking ticket form for this register.
Fields one through five were explained above. The following fields will be presented for entry if you are defining a Picking Ticket form for your register. After entering fields one through five the following screen will display:
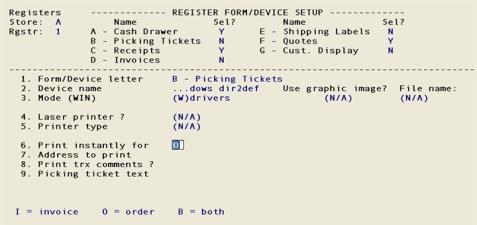
6. Print instantly for
The value you enter in this field determines whether you will print picking tickets instantly after entry of invoices or orders or both.
One of the following entries is allowed for this field.
|
I |
To print picking tickets instantly for invoices. |
|
O |
To print picking tickets instantly for orders. |
|
B |
To print picking tickets instantly for both invoices and orders. |
|
Format |
One character, either I, O, or B. The default is O. |
|
Example |
Select <Enter> to accept the default of O to print picking tickets instantly orders. |
7. Address to print
Choose the address that should be printed on the picking ticket, if any.
|
C |
To print the Company address on picking ticket. |
|
S |
To print the Store address on the picking ticket. |
|
N |
No, do not print an address on the picking ticket. |
8. Print trx comments ?
Your entry here determines whether transaction comments will be printed on the picking ticket.
|
Format |
One character, either Y or N. |
|
Example |
Type Y to print transaction comments on the picking ticket. |
9. Picking ticket text
The text you enter here will replace the printing of the text PICKING For example you may consider calling it a PACKING SLIP, WORK ORDER or LOADING DOC RECEIPT.
|
Format |
27 Characters |
|
Example |
Type P I C K I N G T I C K E T |
The text replacement will only function for instant picking tickets and not for batch.
Field number to change ?
Enter the number of the field you wish to change or use one of the options.
|
<Enter> |
To save the information you have just entered or changed for this form or device. |
|
<Esc> |
To discard entered or changed information for this form or device. |
|
<F2> |
Change a form from instant to optional or vice versa. This option in not available for devices. Instant forms will print immediately after a transaction is completed. Optional forms will only be printed if requested. |
|
<F5> |
To test this form or device. |
The following options are only available for existing forms or devices.
|
<F1> |
To scan through existing forms and devices. |
|
<F3> |
To delete an existing form or device. |
Select C to define a Receipt form.
Fields one through five were explained above. The following fields will be presented for entry if you are defining a receipts form for your register.
6. Receipt format
You may define the format of the receipt that will be printed from this register.
Choose the format you want to print.
|
B |
Basic receipt. |
|
D |
Detailed receipt. |
|
Format |
One character, either B or D. |
|
Example |
Type B to print basic receipts from this register. |
7. Address to print
Enter the address you want to print on the receipt.
Choose the format you want to print.
|
C |
Company address from Company information |
|
S |
Store address |
|
N |
No address will print on the receipt |
|
Format |
One character, either C, S or N. |
|
Example |
Type S to store address. |
Field number to change ?
Enter the number of the field you wish to change or use one of the options.
|
<Enter> |
To save the information you have just entered or changed for this form or device. |
|
<Esc> |
To discard entered or changed information for this form or device. |
|
<F2> |
Change a form from instant to optional or vice versa. This option in not available for devices. Instant forms will print immediately after a transaction is completed. Optional forms will only be printed if requested. |
|
<F5> |
To test this form or device. |
The following options are only available for existing forms or devices.
|
<F1> |
To scan through existing forms and devices. |
|
<F3> |
To delete an existing form or device. |
Select D to define invoice forms for this registers. A screen like the following will display:
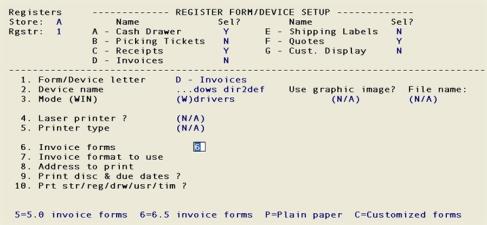
Fields one through five were explained above. The following fields will be presented for entry if you are defining an invoice form for your register.
6. Invoice forms ?
You may use a plain paper invoice format or a format that is compatible with the Passport Business Solutions Order Entry. When a plain paper format is used, preprinted forms are not necessary. Choose the appropriate invoice format.
|
5 |
Compatible with a RealWorld version 5 Invoice format |
|
6 |
Compatible with a RealWorld version 6.x Invoice format |
|
P |
Plain paper Invoices |
|
C |
Customized Invoice format. This is the same as plain paper invoices unless you have a custom invoice that has been programmed. |
|
Note |
Choosing C will print the same invoice format as if you selected P unless you have had a custom modification done to the invoice print programs. |
|
Format |
One character, the default is 6. |
|
Example |
Select <Enter> to accept the default of type 6 |
7. Invoice format to use
This option is not available if you have chosen the Plain paper or Customized form invoice options.
For version 5 and 6.x forms, choose 1, 2, or 3 depending on the format you wish to use.
|
Format 1: |
Two lines per line item are printed on an invoice. The Unit price on line 1 of each item is the undiscounted price of the item expressed in terms of the pricing unit. The extended price on line 2 of each line is the discounted extended price. If a line had a back order quantity, it is printed on line 2. |
|
Format 2: |
Double line: In most situations, two lines of information will be printed. The extended price on line 2 is discounted. If there is any back order information, a third line will be printed showing the back ordered amount. |
|
Format 2: |
Triple line: The extended price is printed, but reflects no line item discounts. The line item discount and back ordered line items are printed on the third line. |
|
Format |
One number, either 1, 2, or 3 |
|
Example |
Type 3 to use Format 2 - Triple line format |
8. Address to print
If you wish to print a company address on the invoice, you may choose to print the Company address or the Store address. Or you may elect to print neither on the invoice.
|
C |
To print the Company address on the invoice |
|
S |
To print the Store address on the invoice |
|
N |
None (do not print an address on the invoice) |
|
Format |
One character, either C, S, or N |
|
Example |
Type S to print the Store address on your invoice |
9. Print disc and due dates ?
If you want the invoice discount date and the due date to print in the header area of the invoice, answer Y in this field.
|
Format |
One character, either Y or N |
|
Example |
Type Y to print the discount date and the due date in the invoice header area |
10. Print str/reg/drwr/usr ?
If you want the store, register, drawer, user, date, and time to print in the total area of the invoice, answer Y in this field.
|
Format |
One character, either Y or N |
|
Example |
Type Y to print the store, register, drawer, user, date, and time in the invoice total area |
Field number to change ?
Enter the number of the field you wish to change or use one of the options.
|
<Enter> |
To save the information you have just entered or changed for this form or device. |
|
<Esc> |
To discard entered or changed information for this form or device. |
|
<F2> |
Change a form from instant to optional or vice versa. This option in not available for devices. Instant forms will print immediately after a transaction is completed. Optional forms will only be printed if requested. |
The following options are only available for existing forms or devices.
|
<F1> |
To scan through existing forms and devices. |
|
<F3> |
To delete an existing form or device. |
Select E to define shipping labels forms for this register.
Fields one through five were explained above. The following fields will be presented for entry if you are defining a shipping label form for your register.
If you wish to print a company address on the shipping label, you may choose to print the Company address or the Store address. Or you may elect to print neither on the shipping label.
|
C |
To print the Company address on the label |
|
S |
To print the Store address on the label |
|
N |
None (do not print an address on the label) |
|
Format |
One character, either C, S, or N |
|
Example |
Type S to print the Store address on your invoice |
7. Left margin (characters)
Enter the width of the left margin in characters.
|
Format |
Up to three digits |
|
Example |
Type 0 to for no left margin |
8. # lines per label
Enter the number of lines that can be printed on your shipping labels. The minimum value allowed if you are not printing a Company or Store address, is 4 lines. You may specify up to 11 lines when you are printing the Company or Store address on a label.
|
Note |
A standard 3" x 5" label will allow up to 18 print lines when printing at 6 lines per inch. |
|
Format |
Up to two digits |
|
Example |
Type 18 to print 18 lines on your label. |
Field number to change ?
Enter the number of the field you wish to change or use one of the options.
|
<Enter> |
To save the information you have just entered or changed for this form or device. |
|
<Esc> |
To discard entered or changed information for this form or device. |
|
<F2> |
Change a form from instant to optional or vice versa. This option in not available for devices. Instant forms will print immediately after a transaction is completed. Optional forms will only be printed if requested. |
The following options are only available for existing forms or devices.
|
<F1> |
To scan through existing forms and devices. |
|
<F3> |
To delete an existing form or device. |
Select F to define quotes forms for this register.
Fields one through five were explained above. The following fields will be presented for entry if you are defining a picking ticket form for your register.
6. Invoice forms ?
You may use a plain paper invoice format or a format that is compatible with the Passport Business Solutions Order Entry. When a plain paper format is used, preprinted forms are not necessary. The format choices are:
|
5 |
RealWorld version 5 Invoice format |
|
6 |
RealWorld version 6.x Invoice format |
|
P |
Plain paper Invoices |
|
C |
Customized Invoice format |
|
Note |
Choosing C will print the same invoice format as if you selected P unless you have had a custom modification done to the invoice print programs. |
|
Format |
One character |
|
Example |
Type 6 to print RealWorld version 6.x style Invoices |
7. Invoice format to use
This option is not available if you choose the Plain paper invoice option, but may be available if you have had a custom modification done to the invoice print programs.
For version 5 and 6.x forms, choose 1, 2, or 3 depending on the format you wish to use.
|
Format 1: |
Two lines per line item are printed on an invoice. The Unit price on line 1 of each item is the undiscounted price of the item expressed in terms of the pricing unit. The extended price on line 2 of each line is the discounted extended price. If a line had a back order quantity, it is printed on line 2. |
|
Format 2: |
Double line: In most situations, two lines of information will be printed. The extended price on line 2 is discounted. If there is any back order information, a third line will be printed showing the back ordered amount. |
|
Format 2: |
Triple line: The extended price is printed, but reflects no line item discounts. The line item discount and back ordered line items are printed on the third line. |
|
C |
Customized Invoice format |
|
Format |
One number, either 1, 2, or 3 |
|
Example |
Type 3 to use Format 2 - Triple line format |
8. Address to print
If you wish to print a company address on the invoice, you may choose to print the Company address or the Store address. Or you may elect to print neither on the invoice.
|
C |
To print the Company address on the invoice |
|
S |
To print the Store address on the invoice |
|
N |
None (do not print an address on the invoice) |
|
Format |
One character, either C, S, or N |
|
Example |
Type S to print the Store address on your invoice |
9. Print disc and due dates ?
If you want the invoice discount date and the due date to print in the header area of the invoice, answer Y in this field.
|
Format |
One character, either Y or N |
|
Example |
Type Y to print the discount date and the due date in the invoice header area |
Field number to change ?
Enter the number of the field you wish to change or use one of the options.
|
<Enter> |
To save the information you have just entered or changed for this form or device. |
|
<Esc> |
To discard entered or changed information for this form or device. |
|
<F2> |
Change a form from instant to optional or vice versa. This option in not available for devices. Instant forms will print immediately after a transaction is completed. Optional forms will only be printed if requested. |
The following options are only available for existing forms or devices.
|
<F1> |
To scan through existing forms and devices. |
|
<F3> |
To delete an existing form or device. |
Select G to define a customer display device for this register.
Fields one through three were explained above. The following fields will be presented for entry if you are defining a quote form for your register.
4. Display emulation
Three display emulation types are support in the PBS Point of Sale.
|
A |
Aedex emulation |
|
E |
UTC Enhanced emulation |
|
C |
CD5220 emulation |
Many display devices can be configured using DIP switches to emulate Aedex or UTC Enhanced protocols.
|
Format |
One character |
|
Example |
Type A for Aedex emulation |
5. Ready line 1 option
Ready line text can be fixed or rotated depending on your entry in this field.
|
1 |
Rotate ready line text |
|
2 |
Normal ready line text display |
|
Format |
One character, either 1 or 2 |
|
Example |
Type 2 for normal text display |
Ready line 1 text
Enter the text to be displayed by the device after a transaction has been completed and before the next transaction has been initiated. Often, customer display devices can display more than the maximum display with when the text is rotated.
|
Format |
Up to 50 characters |
|
Example |
Type Welcome to ACME Hardware |
Ready line 2 option
The second line of display can be used for text or to display the current time.
|
1 |
To display text |
|
2 |
To display the current time |
|
Format |
One character, either 1 or 2 |
|
Example |
Type 1 to use this line to display text |
Ready line 2 text
This field is only available if you elected to display text on the second display line. If you entered 1 in the previous field, you enter the text you wish to display in this field.
|
Format |
Up to 30 characters |
|
Example |
Type Home of the BIG BARGAIN! |
6. Item line 1 option
Choose the information you want to display when line items are being entered or scanned for a transaction.
|
1 |
To display the item number |
|
2 |
To display the item description |
|
Format |
One character, either 1 or 2 |
|
Example |
Type 2 to show the item description on the display device |
Item line 2 option
Choose the information you want do display on line 2 when line items are being entered or scanned for a transaction.
|
1 |
To display the Quantity @ Unit price |
|
2 |
To display the Extended price |
|
Format |
One character, either 1 or 2 |
|
Example |
Type 1 to display the quantity and unit price on line 2 of the customer display device |
7. Total due text
Enter the text that will be displayed on line 1 of the customer display device while the total amount due is displayed on line 2.
|
Format |
Up to 30 characters |
|
Example |
Type Total Due: |
8. Change due text
Enter the text that will be displayed on line 1 of the customer display device while the change due amount is displayed on line 2.
|
Format |
Up to 30 characters |
|
Example |
Type Change due: |
9. Not ready text
Enter the text that will be displayed on line 1 when the register is not ready to process transactions.
|
Format |
Up to 30 characters |
|
Example |
Type **NOT READY** |
Field number to change ?
Enter the number of the field you wish to change or use one of the options.
|
<Enter> |
To save the information you have just entered or changed for this form or device. |
|
<Esc> |
To discard entered or changed information for this form or device. |
|
<F2> |
Change a form from instant to optional or vice versa. This option in not available for devices. Instant forms will print immediately after a transaction is completed. Optional forms will only be printed if requested. |
The following options are only available for existing forms or devices.
|
<F1> |
To scan through existing forms and devices. |
|
<F3> |
To delete an existing form or device. |
|
Note |
If you want to print and/or re-print forms, such as invoices and quotes, from the Point of Sale transaction screen, a form must be defined for the register that you are using to process Point of Sale transaction. You will not be able to print from the Point of Sale transaction screen if you don't define a form for the register. |
If you are only entering printer devices and you are using a standard PCL compliant printer or Windows printer you will probably not have to enter any control codes. However you may have to enter control codes for a printer, cash drawer or display pole.
When setting up devices and printers, you may have to enter hexidecimal codes so that the software can properly control these devices. These are often referred to as “hexidecimal control codes” in the technical reference manual for a device.
The hexidecimal value entry window is a tool developed by Passport Software to simplify the process of entering these hexidecimal control codes. It’s available for all fields in Registers that require hexidecimal codes to be entered.
Control codes are strings of characters that are sent to devices to control the operation of the device. For example, a control code can be sent to a printer to change the number of characters that the printer prints per inch or the printer’s tab settings. Or a control code can be sent to open a cash drawer during a point of sale transaction.
When entry of a new hexidecimal control code is necessary, Passport Point of Sale will display the Hexidecimal Value Window automatically. If a code is already on file, you will be prompted to change the current value.
Any Change ?
To change or view the current value, type Y.
The following is an example of a Hexidecimal Value Window used to enter the control codes that will set a laser printers output to compressed print.

In order to make it easier to enter and edit control codes, the Hexidecimal Value Window provides the following features.
The code is entered one byte (2 hexidecimal digits) at a time.
Character conversion will take a single character you type and convert it to its associated hex code. There is no need to spend time looking up hex equivalents in a conversion table.
Four special codes are available to represent four commonly used hexidecimal controls; ES-Escape (1Bh), SP-Spacebar (20h), CR-Carriage Return (0Dh), LF-Line Feed (0Ah), and FM-Form Feed (0Ch).
Suppose you want to enter control codes to set a smaller font for a HP LaserJet printer. This is the control code that would be entered to set the printer to print 12 characters per inch.
EC ( 8 U EC ( s 0 p 1 2 h 1 2 v 0 s 0 b 0 T
Explaining how this code works is beyond the scope of this documentation.
The Hexidecimal Value Window makes entry of these codes simple. You type:
ES <Enter>
( <Enter>
8 <Enter>
U <Enter>
ES <Enter>
( <Enter>
Notice that you must press <Enter> after each character or special code that is entered. Each code or character is immediately converted to hex; ES is converted to 1B, “(“is converted to 28, “8” to 38, etc.
|
Note |
If a hexadecimal code does not have a character or special code, you must enter the two-digit hex code (e.g. 02h, technically referred to as STX, must be entered as 02). When a hex code is entered that cannot be converted to a displayable character, “<>” is displayed beneath the code. |
Press <Enter> to end entry of codes.
Options
Options available to you when entering hexidecimal codes are:
|
<Enter> |
When you have finished entering the complete control code, leave the current hex code blank and press <Enter>. If there are additional hex codes to the right of the cursor, the will be removed (the code will be truncated). |
|
<Up> |
Press the Up arrow key to highlight the previous hex code entry. |
|
<Down> |
Press the Down arrow key to highlight the next hex code entry. |
|
<F1> |
Insert a blank hex code at the cursor and shift the remaining hex codes to the right one position. |
|
<F2> |
Save the hex code you have entered. |
|
<F3> |
Delete the hex code at the current cursor position and shift the remaining hex codes to the left one position. |
|
Note |
The Hexadecimal Value window is available for all fields in Register Maintenance that require hex codes to be entered. |
Use this selection to print a list of registers. You can print a single register or a range of registers for a single store or for all stores.
Select
Registers from the Reports, setup menu. The following screen displays:
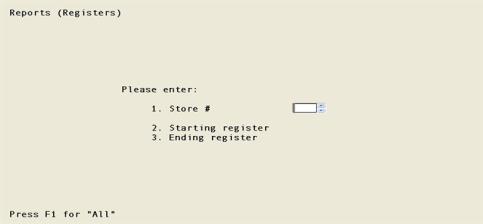
1. Store
Enter the store number or use the option:
|
<F1> |
to print a list of all registers for all stores. |
|
Format |
Up to 3 characters |
|
Example |
Type 1 for Store # 1 |
2. Starting register
Enter the starting number for a range of registers you want to appear on this list or use the option: I
|
<F1> |
To default to the “First” register |
If you are printing all registers for all stores, this field will default to “First” automatically.
|
Format |
Up to 3 characters |
|
Example |
Press <F1> for the “First” register for this store |
3. Ending register
Enter the ending number for the range of registers you want to appear on the list of use the options:
|
<F1> |
To default to the “Last” register |
|
<Enter> |
To default to the register number enter for the Starting register |
If you are printing all registers for all stores, this field will default to “Last” automatically.
|
Format |
Up to 3 characters |
|
Example |
Press <F1> for the “Last” register for this store |
Field number to change ?
Enter the number of the field you wish to change or use one of the options.
|
<Enter> |
To use the information you have just entered and print the Registers list. |
|
<Esc> |
To discard the information that has been entered. |